 An active failover allows for seamless handover to a backup server in case the first server fails. If the primary 3CX Phone System Server fails, the phones will automatically switch to the backup server and/or the backup gateway will become active. Calls will be routed through the same gateway as long as the master server is not present.When the master server is ready to take back the load, the phones will automatically switch back and start using it. This setup does not require any manual interaction to take place. The business logic is implemented in the phones and gateways.
To create such a setup, follow these steps. Important: This set up should be extensively tested before being implemented.
Server Setup:
Recommendation for 50 – 300 users:
- 2 computers with 3CX Phone System Version 10 installed on them.
- Both 3CX Phone System installations must be licensed – this means that each 3CX Phone System must have a separate and valid license key.
- For the purpose of this document, one of the 3CX Phone Systems machines will be called the “Master” and the other will be called the “Slave”.
- Both the “Master” and the “Slave” machines should be assigned a STATIC IP Address, such that their IP Addresses are different, but within the same local IP Subnet.
- Use phones that can be configured for a High Availability setup. At this time, testing has been successfully completed with Snom or Polycom (3.3.1 Firmware) devices.
- You will need to have a good understanding of phone provisioning with 3CX Phone System.
Step 1: Install and Configure 2 3CX Phone System Servers
Install 3CX Phone System on 2 computers with different IP addresses and activate each 3CX Phone System installation with a separate license key. As far as the different roles which will be assigned to these two 3CX Phone System installations:
- The first 3CX Phone System machine will be designated as the “Master” – the PBX that provides regular Telephone System functionality to your LAN. For the rest of this document, we will assume that this machine’s network name will be “MASTER3CX”.
- The second 3CX Phone System machine will be designated as the “Slave” – the PBX that provides backup Telephone System functionality to your LAN when the “Master” fails. For the rest of this document, we will assume that this machine’s network name will be “SLAVE3CX”.
- On the MASTER3CX host:
- IMPORTANT: Do not miss the following steps, since they are absolutely required for the High Availability templates for phones and gateways to function correctly (installing and using the High Availability templates is described further on in this guide).
- Open the 3CX Management Console.
- In the sidebar, navigate to the “Settings – Advanced” node.
- Go to the “Custom Parameters” tab.
- Scroll to the bottom of the list, and:
- Add a variable with the name “BACKUP_PBX_IP”, and set the value to the LAN IP Address of the SLAVE3CX host.
- Add a variable with the name “BACKUP_PBX_SIPPORT”, and set the value to the SIP Port of the SLAVE3CX host installation of 3CX Phone System. Typically this value should be set to “5060″.
- Click the “OK” button at the bottom of the page.
Step 2: Prepare a Centralized Location Accessible to Both 3CX Phone Systems
To create a high-availability solution, both Master and Slave PBX machines need access to a location (network share) on a completely separate machine to store and retrieve backups. For the rest of this document, we will assume that this separate machine’s network name will be “BACKUP3CX”.
- If you will be using Domain Member machines, you must create a domain user called “3cxuser” with password “3CXpass$”, and make this user a member of the “Domain Admins” group.
- If you will be using machines that are NOT joined to a domain, on each of the MASTER3CX, SLAVE3CX, and BACKUP3CX machines, you must create a local user called “3cxuser” with password “3CXpass$”, and make this user a member of the local “Administrators” group.
- Make sure that while creating the user, you set the options as follows:
- UNCHECKED == User must change password at next logon.
- CHECKED == User cannot change password.
- CHECKED == Password never expires.
- UNCHECKED == Account is disabled.
- On each of the MASTER3CX, SLAVE3CX, and BACKUP3CX machines, you must disable User Account Control. For more information visit http://www.petri.co.il/disable-uac-in-windows-7.htm
- On the “BACKUP3CX” machine:
- create a folder “c:3cxdata”, share it, and assign the following rights
- in the “Share Permissions” tab, set the “Everyone” user to have “Full Control” (since we will be controlling access through the “Security” tab, and not through the “Share Permissions” tab)
- in the “Security” tab, edit the list of allowed users, add “3cxuser” to the list of allowed users, and set the “3cxuser” user to have ALL rights to except “Full Control”
Step 3: Install and Modify Scripts to Create Regular Backups on the Master PBX
- Create a folder called “c:3cx_scripts”
- Download the scripts for the Master PBX here:
http://www.3cx.com/downloads/community/other/active-active/master.zip
- Extract the contents of the zip file into “c:3cx_scripts”
- Using Notepad, open “c:3cx_scriptsbackup.bat”
- The top part of the script contains 4 sections which you need to edit to reflect your environment
- The first section is where we specify the parameters for the MASTER3CX host to connect to the BACKUP3CX host for access to the Shared Storage location. The defaults reflect the settings listed earlier in this document, but you may need to customize as follows:
- StoragePath – this variable reflects the UNC path to the machine providing the shared storage location. The default value is “\BACKUP3CX3cxdata” – this reflects the previously-suggested settings where the machine providing the shared storage was named “BACKUP3CX” and the shared folder created was “3cxdata”. To avoid possible difficulties with DNS resolution, you can replace “BACKUP3CX” with the IP Address assigned to the BACKUP3CX machine.
- StorageUser – this variable contains the username with which the MASTER3CX machine has been granted access to the BACKUP3CX host. If you are in a domain environment, the username must be specified in domainuser format. So for example, if the domain is “mydomain” and the user is “3cxuser”, you would set this line to “set StorageUser=mydomain3cxuser”.
- StoragePass – this variable contains the password with which the MASTER3CX machine has been granted access to the BACKUP3CX host.
- The second section is where we specify the parameters for the MASTER3CX machine to connect to an SMTP Server to deliver Email Messages to notify a system administrator with the contents of the backup report. You may need to customize as follows:
- SMTPserver – this variable reflects the SMTP host which will be used by the MASTER3CX host to deliver Email Messages.
- SMTPport – this variable reflects the port number on which the SMTP host is listening for email delivery requests. The default is port 25, and for most mail servers this value does not need to be changed.
- SMTPfrom – this variable contains the email address which will be in the FROM field for the email messages being sent by the MASTER3CX host
- SMTPto – this variable contains the email address which will be in the TO field for the email messages being sent by the MASTER3CX host
- The third section is where we specify the parameters for the MASTER3CX host to connect to the SLAVE3CX host to trigger the restoration of the backups being created by the MASTER3CX host. The default reflects the settings listed earlier in this document, but you may need to customize as follows:
- SlavePBX – this variable reflects the HostName of the machine which is the Slave 3CX Phone System. The default assumes that the Slave system is called “SLAVE3CX”. To avoid possible difficulties with DNS resolution, you can replace “SLAVE3CX” with the IP Address assigned to the SLAVE3CX machine.
- SlaveUser – this variable contains the username with which the MASTER3CX machine has been granted access to the SLAVE3CX host.
- SlavePassword – this variable contains the password with which the MASTER3CX machine has been granted access to the SLAVE3CX host.
- The fourth section is where we specify how the backup script can interpret values for YEAR, MONTH, DAY, HOUR, MINUTE (also to create a datetimestamp variable called DATETIME). By default, these values are set for standard settings for the United States locale. You will need to adjust these values to correctly reflect the locale on the MASTER3CX and SLAVE3CX hosts.
Step 4: Install and Modify Scripts on the Slave PBX
These steps must be performed on the SLAVE3CX host.
- Create a folder called “c:3cx_scripts”
- Download the scripts for the Slave PBX here:
http://www.3cx.com/downloads/community/other/active-active/slave.zip
- Extract the contents of the zip file into “c:3cx_scripts”
- Using Notepad, open “c:3cx_scriptsbackup.bat”
- The top part of the script contains 4 sections which you need to edit to reflect your environment.
- The first section is where we specify the parameters for the MASTER3CX host to connect to the BACKUP3CX host for access to the Shared Storage location. The defaults reflect the settings listed earlier in this document, but you may need to customize as follows:
- SSPATH – this variable reflects the UNC path to the machine providing the shared storage location. The default value is “\BACKUP3CX3cxdata” – this reflects the previously-suggested settings where the machine providing the shared storage was named “BACKUP3CX” and the shared folder created was “3cxdata”. To avoid possible difficulties with DNS resolution, you can replace “BACKUP3CX” with the IP Address assigned to the BACKUP3CX machine.
- SSUser – this variable contains the username with which the MASTER3CX machine has been granted access to the BACKUP3CX host.
- SSPassword – this variable contains the password with which the MASTER3CX machine has been granted access to the BACKUP3CX host.
- The second section is where we specify the parameters for the MASTER3CX machine to connect to an SMTP Server to deliver Email Messages to notify a system administrator with the contents of the backup report. You may need to customize as follows:
- SMTPserver – this variable reflects the SMTP host which will be used by the MASTER3CX host to deliver Email Messages.
- SMTPport – this variable reflects the port number on which the SMTP host is listening for email delivery requests. The default is port 25, and for most mail servers this value does not need to be changed.
- SMTPfrom – this variable contains the email address which will be in the FROM field for the email messages being sent by the MASTER3CX host.
- SMTPto – this variable contains the email address which will be in the TO field for the email messages being sent by the MASTER3CX host.
- The third section is where we specify how the backup script can interpret values for YEAR, MONTH, DAY, HOUR, MINUTE (also to create a datetimestamp variable called DATETIME). By default, these values are set for standard settings for the United Kingdom locale. You will need to adjust these values to correctly reflect the locale on the MASTER3CX host.
Step 5: Test the Solution, and Automate the Solution
- From the MASTER3CX host, use Windows Explorer to navigate to “c:3cx_scripts”
- Double-Click on the “backup.bat” script. This should trigger the following sequence of events:
- On the MASTER3CX host:
- The backup procedure starts by setting up the environment variables it needs.
- The MASTER3CX host connects to the shared storage location on the BACKUP3CX host.
- A backup of the 3CX Phone System installation is started, including Call Recordings, VoiceMails, Voice Prompts, Call History, and Firmware files.
- The backup file is saved to the shared storage location, and a backup log file is also saved to the shared storage location.
- An email notification is sent to the system administrator attaching the contents of the backup log.
- The backup log file is renamed to have a DateTimeStamp within the filename.
- The MASTER3CX host’s connection to the shared storage location is closed.
- The MASTER3CX host triggers the SLAVE3CX host to start the restore script.
- Now, on the SLAVE3CX host:
- The restore procedure starts by setting up the environment variables it needs.
- The SLAVE3CX host connects to the shared storage location on the BACKUP3CX host.
- A restore of the 3CX Phone System installation is started, using the backup file created by the MASTER3CX host.
- A restore log file is saved to the shared storage location.
- An email notification is sent to the system administrator attaching the contents of the restore log.
- The backup file is renamed to have a DateTimeStamp within the filename (and also to avoid restoring the same file again).
- The backup log file is renamed to have a DateTimeStamp within the filename.
- The MASTER3CX host’s connection to the shared storage location is closed.
- Confirm that you receive the emails for both the backup and the restore processes, and check the contents of the attached log files to confirm that the backup and restore processes have completed successfully.
- On the MASTER3CX host, create a task in Windows Task Scheduler that will execute the script every day during out of office hours.
Step 6: Configure your IP Phones for Failover
- First you need to adjust the IP phone configuration templates for the phone. Please note that not all IP phones support an active / active failover scenario. You can use the following template files to configure a Snom or a Polycom phone respectively:
- Download the Snom High Availability template file here: http://www.3cx.com/downloads/community/other/active-active/snom-ha.ph.xml
- Download the Polycom High Availability template file here: http://www.3cx.com/downloads/community/other/active-active/polycom-ha.ph.xml
- Copy the downloaded files into the phone template folder for the MASTER3CX host’s 3CX Phone System (c:programdata3cxdatahttptemplatesphones).
- Next, provision all your phones using the High Availability templates (labelled, for example, “Snom 370 HA” or “Polycom SPIP335 (3.3.x) HA”)
- The MASTER3CX 3CX Phone System will configure the phones to connect to both the MASTER3CX (primary) and the SLAVE3CX (secondary) 3CX Phone System installations. The SLAVE3CX 3CX Phone System will have the exact same settings due to the backup and restore scripts.
Step 7a: Configure a Second Trunk Inside your Gateway
If you use a beronet berofix Gateway:
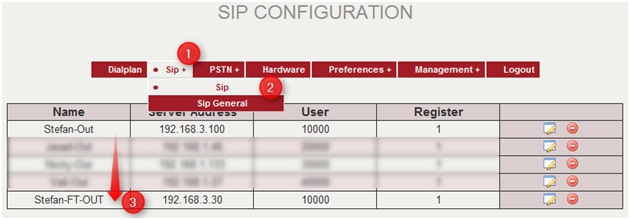
Open the existing configuration of the beronet gateway (PSTN) and configure the gateway in a way to make it aware of the slave host. Add an additional SIP trunk with the same username and password as for the master host but enter the IP of the slave host. In this case it is called Stefan-FT-OUT.

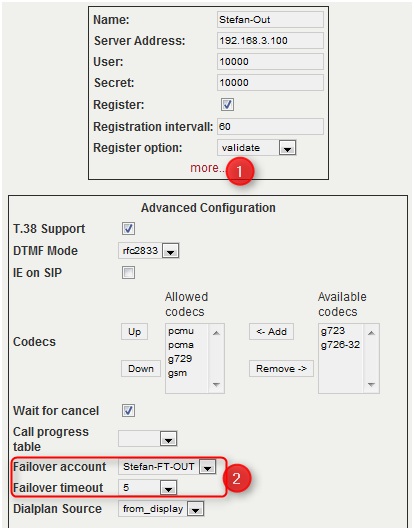
Now open the original master config “Stefan-OUT” and define the “Stefan-FT-OUT” as failover ID, when the server master does not answer within 5 seconds.

If you use a Patton 4554/4638 Gateway:
- If you use a Patton gateway you need to download the templates found here.
- Extract the contents of the downloaded zip file into the gateway template folder for the MASTER3CX host’s 3CX Phone System (c:programdata3cxdatahttptemplatesgateway).
- Now, from the MASTER3CX host, create the gateway in the 3CX Management Console based on the new templates as normal.
- Create the config file from the 3CX Management Console of the MASTER3CX host for the Patton gateway and import it to the device.
- Once complete, synchronize the configuration from the MASTER3CX host to the SLAVE3CX host (by triggering the backup script as described in Step 4).
- Now, log onto the Patton’s Web Interface, and click the “Reload” link in the sidebar – this will force the Patton to register with both the MASTER3CX host and the SLAVE3CX host.
Step 7b: Configuring a Redundant Beronet VoIP Gateway
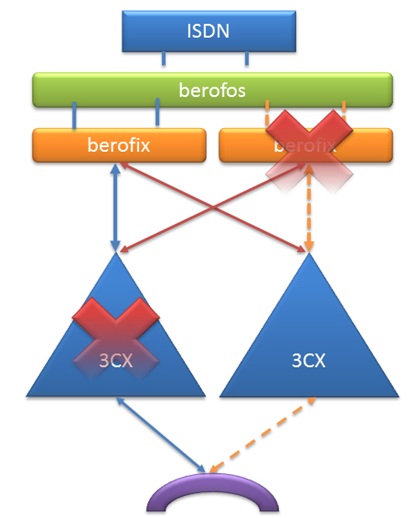
Step 7b only applies for users with 2 beronet berofix’s in combination with a berofos. In a High Availability or Active / Active connection, the target is to reduce or eliminate single points of failure. Ideally any call relevant parts should be set up with duplicates ready to take over the work without user interaction.
When telephony is mission critical and when there are 50 users or more, we recommend that besides the PBX server you also make the gateway fully redundant. This will protect you from failures of the gateway itself and also from the telecom line connected to it.
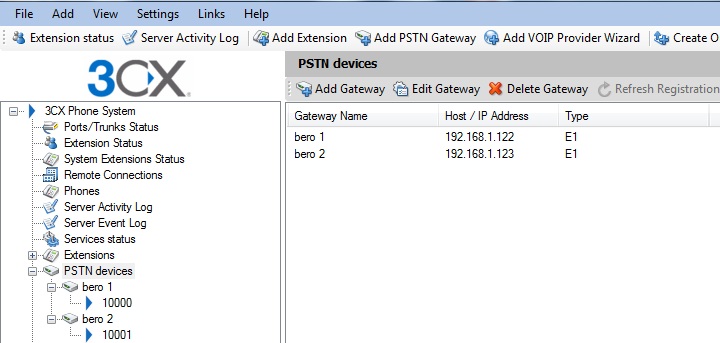
To do this, you need to buy 2 identical gateways from beronet and a berofos. Create a second gateway with a different IP than the primary PSTN gateway in the 3CX Management Console so that 3CX Phone System is aware of both gateways.

After creating the second gateway, sync the configuration over to the slave PBX and redo Step 7a in this guide, however use a different username and password from the first gateway. At this point we have created a multiple cross route between gateways and the 3CX hosts. In order that 3CX Phone System knows to use both gateways for outbound dialing, declare the second gateway as route 2 in the outbound rules.

The berofos is required to switch the NTBA Lines from gateway 1 to gateway 2 in case a gateway loses functionality. This is done by a watchdog implemented inside the berofix and the berofos. If a heartbeat is not detected by the berofos, the berofos will determine that the gateway is faulty and will switch the public lines to gateway 2. For more information, refer to the beronet guide “berofos” here.

How the Fail-Over Works
The Failover solution is activated when the MASTER3CX host 3CX Phone System fails. Due to the expiration timers in the phones (set to 60 seconds in the templates) they will detect that a re-registration to the MASTER3CX host has failed and use the SLAVE3CX host to place calls. This implies that the maximum downtime for outbound calls should not exceed 60 seconds. Incoming calls should function with practically no downtime.
For the redundancy of the gateway, the same principle applies. 3CX Phone System will try to route calls to the master gateway as long as its trunk port status is green. If the gateway does not answer for 30 seconds, 3CX Phone System will try to reach route 2. After 60 seconds without a response from gateway 1, the port trunk status will switch to red and 3CX Phone System will start to use route 2 to place calls. The berofos will have assigned the external lines to gateway 2 and calls can now be sent and received as normal.
Once your system is functioning in Failover mode, you can restore the MASTER3CX host from a stored backup and the phones will re-register to the MASTER3CX host and route calls via the MASTER3CX host automatically. This applies to the gateways as well, however it is recommended to bring the MASTER3CX host or the gateway back online at times when the telephony traffic is low.
Limitations
- You can not use a VoIP provider at this time in Active / Active scenarios due to limitations from VoIP providers.
- Maximum loss of call history is 24 hours, however to minimize loss of call history data, you can create a back-up from the slave host prior to restoring the master to operation.
- In case of a fail-over, MWI and BLF will not work on the phones.
- In case of a fail-over, 3CX MyPhone connections will be terminated and will require a restart to the IP address of the SLAVE3CX host.
Important: This set up should be extensively tested before being implemented.