 Connecting an External Extension to 3CX PhoneSystem is often requested, and can be extremely useful for linking small remote offices and home workers. Here we get a shot at using other phones as External Extensions.
Note: If you are looking for instructions to connect a SIP Hardphone using the 3CX Tunnel Protocol via the 3CX SIP Proxy Manager, please view this guide.
Using a SIP Hardphone as a Direct External Extension
For a SIP Phone to work as an External Extension, it will be necessary to configure some additional phone features – assuming that the features are available.
3CX Phone System Options/Requirements
There are some options that need to be configured to allow SIP Phones to register and work with 3CX Phone System from remote locations.
Step1: Allow external phones to register with 3CX Phone System
- Double Click on any extension Other Tab Extension Options
- Disallow use of extension outside the LAN : This option needs to be unchecked.
STUN Client Functionality
This is an absolute requirement for a phone to be able to function as an External Extension. The phone will use the services of a STUN Server to understand what its public IP Address is, and what port address translations will occur as the traffic it sends and receives to/from the PBX traverses the WAN-to-LAN boundary at the remote location.
Without STUN support, it will be necessary to perform some custom configurations on the WAN-to-LAN device in the remote location. This implies that you will need, for each phone in the remote location, to configure on the phones SIP and RTP ports that are unique for each unit, then also statically configure on the phone what is the public IP Address it is using, and then create the necessary port forwarding rules on the remote location’s WAN-to-LAN device. This is inconvenient to say the least, requires a static public IP Address at the remote location, and is definitely to be avoided for anything beyond casual use, or if you have absolutely no other option. Troubleshooting such setups can rapidly consume so much time that purchasing a phone device that has STUN support is a more cost-effective option.
Keep-Alive Functionality
A phone which is NAT-aware will almost always provide Keep-Alive functionality. The phone will periodically send keep-alive messages to the PBX. The scope of sending keep-alive messages is to ensure that the NAT mappings which the WAN-to-LAN device (between the phone and its internet connection) creates remain the same. Without this, shortly after the phone registers the NAT mapping on the WAN-to-LAN device would expire, and there would be no way for the WAN-to-LAN device to know where to route incoming SIP messages from the PBX to the phone.
RPort Functionality
RPort functionality is a SIP extension to add extra information about IP Address and Port translations. The device generating a SIP request adds a blank “rport” parameter to the VIA line in the packet indicating that RPort functionality is available before transmitting the SIP Packet. The receiving entity will detect this, and populate the “rport” field with the port number which was declared in the IP header as the source port, and also add a new “received” parameter and populate it with the IP Address which was declared in the IP header as the source IP Address.
A phone that has this functionality implemented can help reduce NAT traversal issues in several situations.
This functionality is not a necessity, but will allow the phone to work behind wider range of WAN-to-LAN devices.
Configuring a Cisco (or Linksys) SPA as an External Extension
To configure a Cisco SPA as an External Extensions, you will need to start as if configuring for a LAN Extension, then do the following:
Step1: Enable NAT Settings
Click on Admin Login Advanced Ext 1. In the section ”NAT Settings”, set “NAT Mapping Enable” and the “NAT Keep Alive Enable” fields to “yes”
Step2: Configure Public IP to 3CX Phone System
Click on Admin Login Advanced Ext 1. Scroll down to the section “Proxy and Registration”. Set the Proxy IP Address to the public IP Address of the 3CX PhoneSystem machine
Step3: Configure advanced NAT options
Click on the “SIP” tab, and navigate to the section “NAT Support Parameters”. Set the following options:
- “Handle VIA rport” field to “yes”
- “Insert VIA rport” field to “yes”
- “STUN Enable” field to “yes”
- “STUN Server” to “stun.3cx.com”
- “NAT Keep Alice Intvl” to “15″
Configuring a Grandstream Executive phone as an External Extension
To configure a Grandstream Executive Phone as an External Extensions, configure it in LAN Mode and then do the following:
Step1: Enable STUN
Click on Settings Advanced
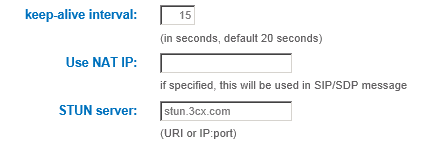
- “keep-alive interval” field to “15″
- “STUN server” field to “stun.3cx.com”
Step2: Configure Public IP to 3CX Phone System
Click on “Account 1″ page, set the “SIP Server” field to the public IP Address of the 3CX Phone System Computer
Step3: Configure advanced NAT options
In Account 1 page set NAT Traversal to STUN.
Configuring a Grandstream GXP phone as an External Extension
To configure a Grandstream GXP as an External Extensions, configure it in LAN Mode and then do the following:
Step1: Enable STUN
Click on Settings Advanced
- “keep-alive interval” field to “15″
- “STUN server” field to “stun.3cx.com”
Step2: Configure Public IP to 3CX Phone System
Click on “Account 1″ page, set the “SIP Server” field to the public IP Address of the 3CX Phone System Computer
Step3: Configure advanced NAT options

Enable NAT Traversal In Grandstream GXP Phones
For Grandstream GXP Phones, there are 2 options that need to be enabled. Scroll down in the “Account 1″ page and set:
- “Use RFC3581 Symmetric Routing” field to “Yes”
- “NAT Traversal (STUN)” field to “Yes”
Configuring a Polycom as an External Extension
Polycom phones do not have STUN functionality in the phones. However in some cases you can get a Polycom working as a remote extension by configuring the “Network Address Translation” Section. This option can be found in the Network Section of the web interface.
Step1: Configure Public IP to 3CX Phone System
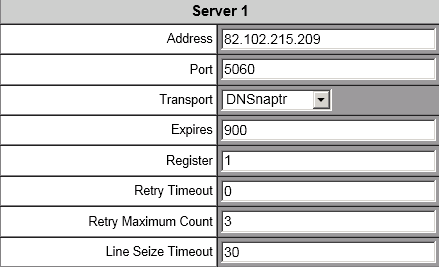
Click on Lines Server 1 and in the Address section enter the Public IP Address of the 3CX Phone System that you want to connect to.
Step2: Enable NAT
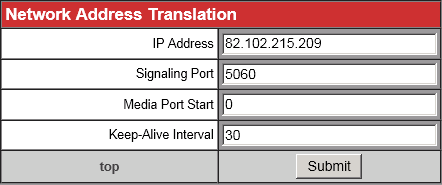
Click on Network NAT. Scroll down to the section “Network Address Translation”.
- IP Address: Configure IP Address to the Public IP Address of the 3CX Phone System Server.
- Signaling Port: Enter the SIP Port of the 3CX Phone System you want to connect to
- Keep-Alive Interval: Set this to 30 seconds
Configuring an Aastra as an External Extension
To configure an Aastra as an External Extensions, you will need to start as if configuring for a LAN Extension, then do the following:
Step1: Configure Public IP to 3CX Phone System
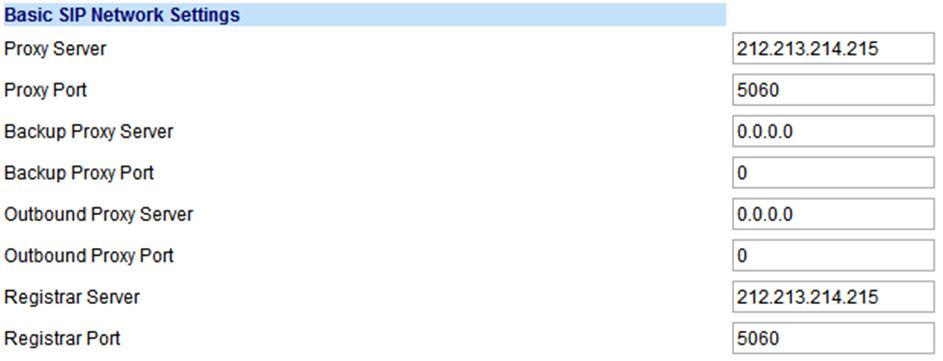
In the “Advanced Settings – Global SIP” page, go to the “Basic SIP Network Settings” section, and set the “Proxy Server” and “Registrar Server” fields to the public IP Address of the 3CX PhoneSystem machine
Step2: Enable STUN
In the “Advanced Settings – Network” page, go to the “Advanced Network Settings” section, and set:
- “STUN Server” field to “stun.3cx.com”
- “Rport (RFC3581)” field to Enabled
Configuring a Snom as an External Extension
To configure a Snom as an External Extension, you will need to start as if configuring for a LAN Extension, then do the following:
Step1: Configure Public IP to 3CX Phone System
Click on “Identity 1″ page, go to the “Login Information” section , and set the “Registrar” field to the public IP Address of the 3CX PhoneSystem machine
Step2: Enable STUN
In the “Identity 1″ page, click the “NAT” tab, and set:
- “STUN server” field to “stun.3cx.com”
- “Keepalive interval” field to “15″
Configuring a Yealink/Tiptel Phone as an External Extension
To configure a Yealink as an External Extension, you will need to start as if configuring for a LAN Extension, then do the following:
Step1: Configure Public IP to 3CX Phone System
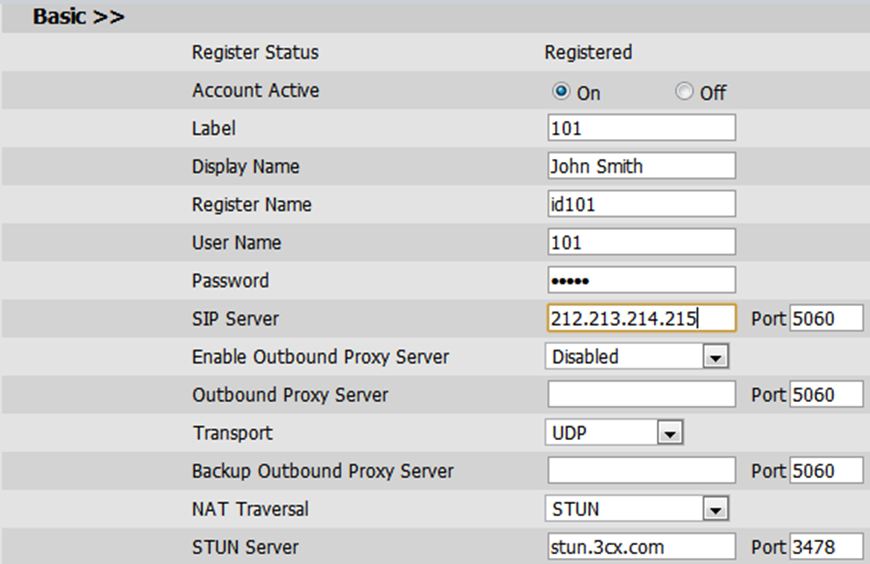
Click on the “Account” tab, select “Account 1″ and in the “Basic” section set the following options:
- SIP Server: Enter the public IP Address of the 3CX PhoneSystem machine (in this example 212.213.214.215)
- SIP Server Port: Enter the SIP listening port of the 3CX PhoneSystem machine (in this example 5060)
- NAT Traversal: Set this to “STUN”
- STUN Server: Set this to “stun.3cx.com”
Step2: Configure Advanced options
Whilst still in “Account 1″ scroll down and click on “Advanced”. Set the following options:
- “UDP Keep-alive Message” field to “Enabled”
- “UDP Keep-alive Interval” field to “15″
- “RPort” field to “Enabled”


