 The following configuration steps have been tested with Panasonic KX-TGP500B01 using the KX-TPA50 handsets and firmware revision 22:58. Note that different firmware revisions may have a different web interface and/or different functionality. This guide is based on a new phone OR one that has been reset to factory defaults. If in doubt, reset the phone to Factory Defaults.
The KX-TGP500 allows up to 8 SIP account, 6 DECT phones and up to 3 simultaneous calls.
Optional: To provision the basic settings of the DECT base, you need to create at least one new extension and use KX-TGP500B01 provisioning template. Since many DECT phones are used in conjunction with a desk phone, the two phones will be using the same extension (using SIP Forked ID). In this case, you will need to create a dummy extension, and configure it the new DECT phone. After provisioning the phone with the details of the new extension, you can delete the dummy extension from 3CX Phone and configure SIP Account 1 with the details of the existing extension.
This guide covers the following steps. All steps need to be done for successful configuration:
- Register the first handset with the DECT base
- Enable the Web interface of the DECT base station
- Update the firmware version of the DECT base station
- Configure provisioning information in 3CX Phone System for the new phones
- Transfer the configuration to the Panasonic DECT system automatically
- Configure additional DECT participants (possibly as a 2nd unit to a desk phone)
1. Register the first handset with the DECT base
- Connect the DECT base station to the power and network
- Start the DECT base station. At this state, it will try to obtain an IP via DHCP
- The LED on the front will start flashing when it is ready
- From your first handset, press the joystick to access the Main Menu
- Select the wrench( Initial Settings), and navigate to the “Registration” section
- Select “Register H.set”
- From the base station, press the Connection button and keep it pressed for 4 seconds till the base LED starts flashing in red.
- From the handset, press OK and enter “0000” when asked for the PIN.
- If pairing is successful, the LED starts flashing in orange again, and the handset’s display will show “Handset 1″
2. Enable the Web interface of the DECT base station
- From the handset, press the joy stick to access the Main Menu, and select the Case icon (“IP Service”) Network Settings IP Settings. Take note of the IP address of the DECT base station.
- From the main screen, press the joy stick to access the Main Menu, and select once again the Case icon (“IP Service”) Network Settings. Open “Embedded WEB”, and change the option to ON.
- Using a web browser, navigate to the web interface of the DECT base station, using the IP address noted previously.
- The default username and password for the DECT base station are “Admin” and “adminpass”
3. Update the firmware version of the DECT base station
- Before the DECT system in operation you should put the firmware update manually
- Open the web interface of the DECT base station Maintenance Local Firmware Update
- The firmware can be found at: http://panasonic.net/pcc/support/sipphone/download/TGP/eu.html
- After you have completed the firmware update to boot the new DECT base station
- Using the handset, you need to activate enable “Embedded WEB” as shown in step 2.
4. Configure provisioning information in 3CX Phone System for the new phone
- From the 3CX Management Console Extensions, select to “Add Extension”.
- Configure the details of the extension in the General tab.
- Change to the phone provisioning tab
- Specify the 12-character MAC address of the phone. This information can be found in the web interface of the DECT base station under Status Network Status
- From the model drop down, select “Panasonic KT-TGP500”

- Click OK to create the provisioning configuration file. The file is created in a directory on the web server and will be retrieved by telephone when it starts-up.
5. Transfer the configuration to the Panasonic DECT system automatically
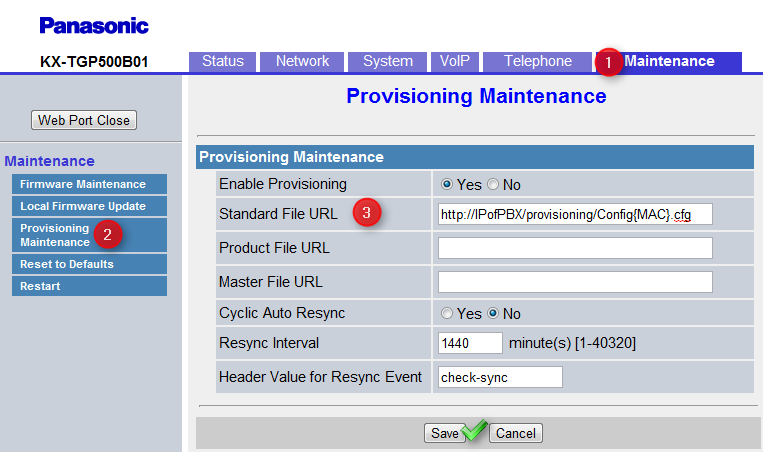
- In the web interface of the DECT base station, change to the “Maintenance tab Provisioning Maintenance Standard File URL”

- Enter the URL http://IPofPBX:5000/provisioning/Config{MAC}.Cfg. Replace IPofPBX with the IP address of 3CX Phone System
- Select “Save” when ready.
- Wait for the LED on the DECT base station to change to green
- This is first SIP account associated with the handset 1 and ready for incoming and outgoing calls
6. Configure additional DECT participants (possibly as a 2nd unit to a desk phone)
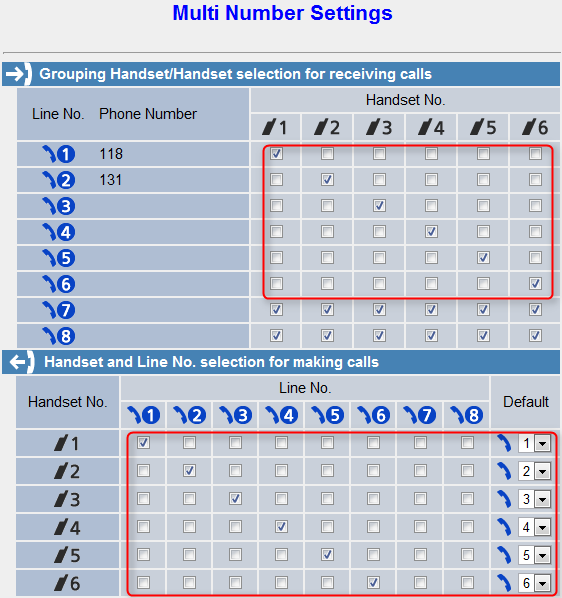
Up till now, you have configured your first handset. If you need to connect additional handsets, you will need to configure the SIP information for the new accounts manually. All the settings except the extension number, Extension ID and password for all SIP accounts are already configured when you provisioned the first extension. The mapping between Extension number and Handset number can be configured from “Base Telephone Multi-Number” setting. This allows you to configure the settings for both incoming and outgoing calls.

To create more extensions in the DECT system, you need to:
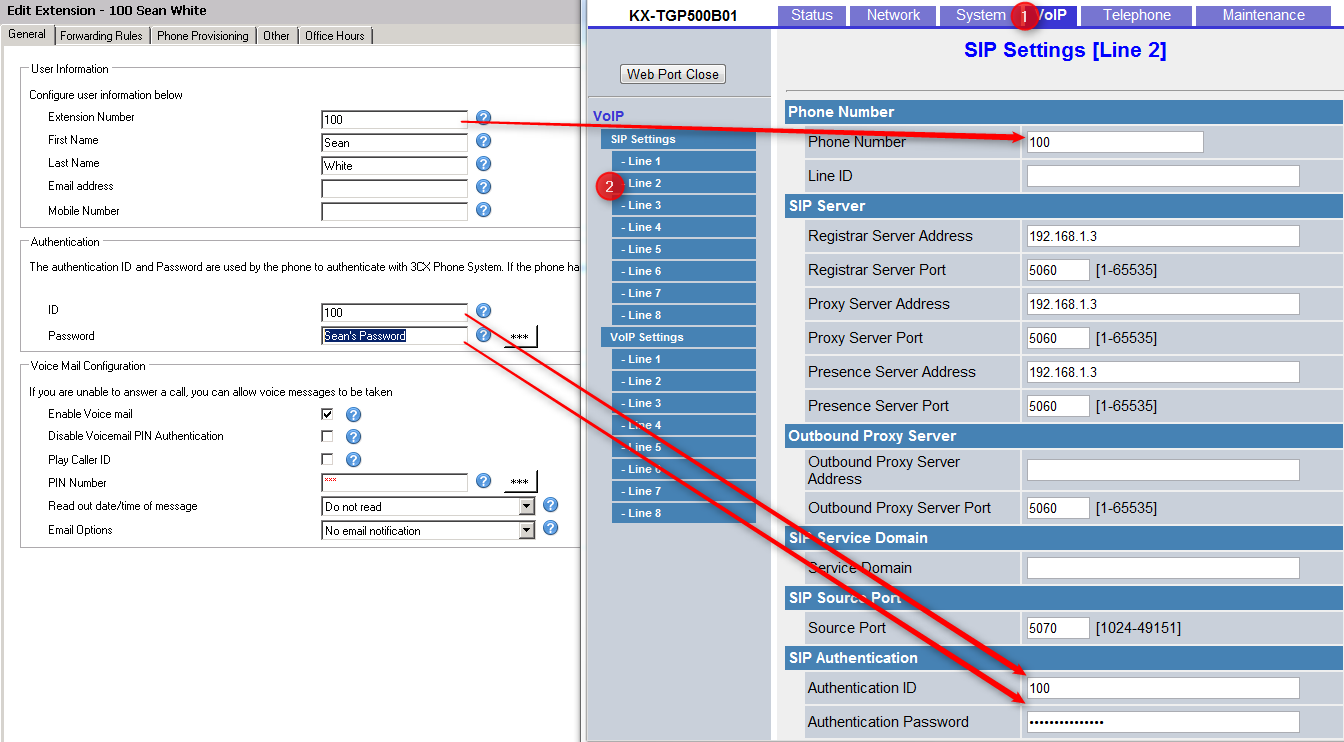
- Configure a new extension in 3CX Phone System. You do not need to configure the settings in the “Phone Provisioning” tab.
- Use the settings from an existing
Then switch to Telephone Call Control Line 2 and use the display name of the extension.

Repeat this process for each additional DECT extension.
Limitations
• The 3CX Phone book cannot be provisioned on the devices
• Calls from queues and ring groups will leave a missed call on he device (irrespective on if the call is taken by the agent)
• If you use 3CX Phone to make a call, the device will not play music on hold and not tone is heard.
