 Group Policies provide the ability to deploy applications and configurations across hundreds or even thousands of computers in an organization. It is very important that procedures like these are tested thoroughly in a non-production environment before it goes live.
This article describes how to distribute 3CX MyPhone Silverlight Out of Browser on your network or to each user on a terminal server. This makes it easier for users to access 3CX MyPhone, and if you want to deploy the 3CX Desktop Components via Group Policies.
This guide has been tested using Windows 2008 R2 with Terminal Services Role and Microsoft Active Directory Services and Windows 7 clients.
Instructions
- Connect to the host PBX and navigate to: C:ProgramData3CXDataHttpInterfaceMyPhoneClientBin
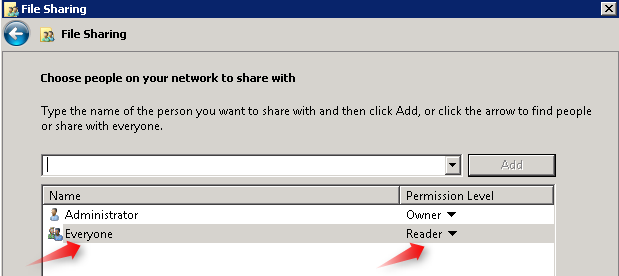
- Right click on the “ClientBin” folder and click on Sharing. Click Share and grant rights for “everyone” with the permission level to read.
- Download the file “MyPhoneDeploy.bat” from here and place it in the ClientBin folder.
- Open the file “MyPhoneDeploy.bat” with a text editor and edit the highlighted line replacing “IPPBX” with the IP Address of the 3CX Phone System server. In this example, the IP Address of the 3CX Phone System server is 192.168.3.100 so the script will look like this:
%sllauncherlocation% /install:”\192.168.3.100ClientBinMyPhone.xap” /origin:”http://192.168.3.100:5000/myphone/ClientBin/MyPhone.xap” /shortcut:desktop+startmenu /overwrite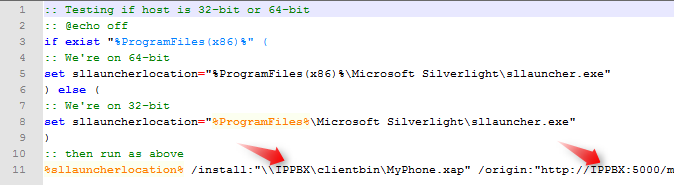
- Access the Group Policy Management on the Domain controller
- Add an Organization Unit (OU) (in this example, Terminal Users) that specifies which domain users are allowed to receive the 3CX MyPhone installation.
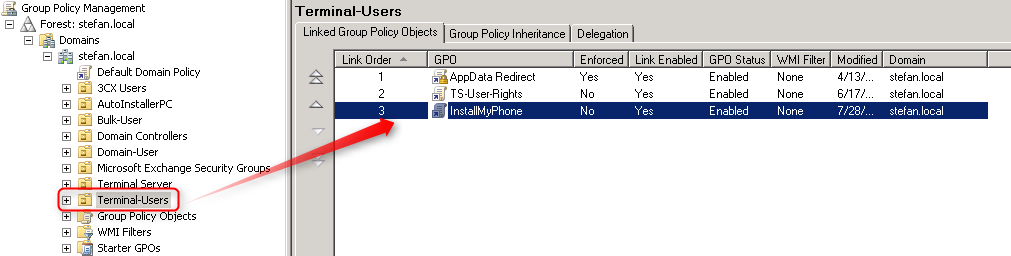
- Add and Link a new Group Policy in this Organization Unit. In this example it is called InstallMyPhone.
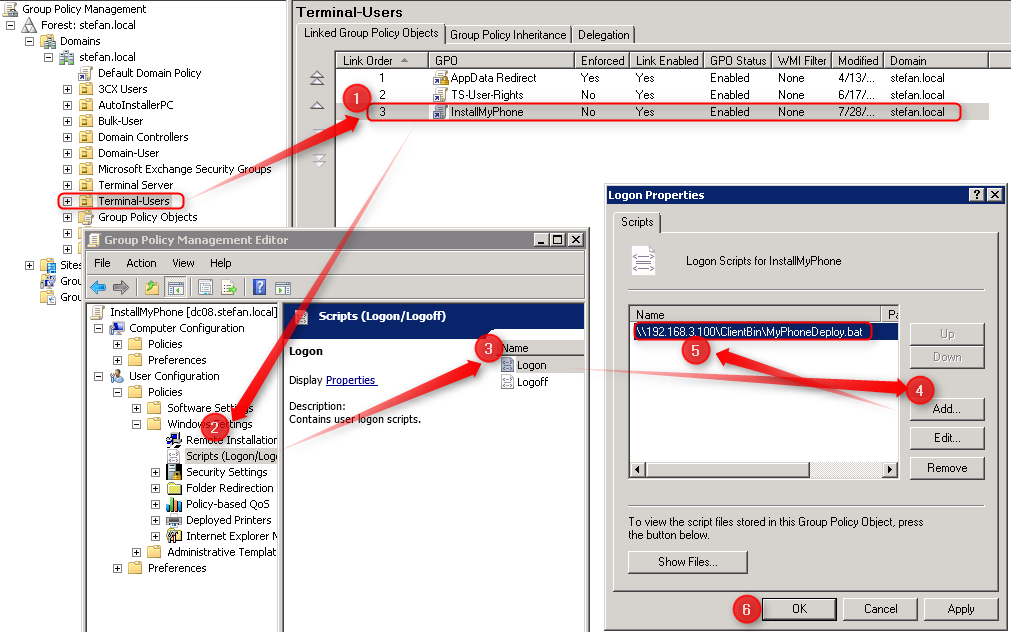
- In the Logon Properties section (User configuration ? Policies Windows settings Scripts), add a new Logon script pointing to the network location we created in point 2. For example: \192.168.3.100ClientBin and add the file “MyPhoneDeploy.bat”
- Save all settings
To test, open a command prompt window from a Windows 7 desktop client and enter “gpupdate” to update the client’s Group Policies immediately.
Note: The log-on script is executed each time the user logs in. This causes 3CX MyPhone to be installed each time the user logs in.
To uninstall 3CX MyPhone when the user logs off, add a logoff script which can be downloaded from here.