In this article, we will see how to configure a Zyxel P-662 to allow traffic required by 3CX Phone System. This is a 2 step process – first, we will configure the firewall to allow VoIP traffic from the internet and secondly we will configure the firewall to route the VoIP traffic to 3CX Phone System.
Notes:
- This procedure has been tested on Zyxel P-662H-D1 using ZyNOS Firmware Version V3.40(AGZ.9) | 01/08/2010
- This procedure should only be used if you intend using VoIP Providers, Remote Extensions or Bridges.
- Note that Port 5000 and 5090 do not need to be opened on the router if you are only using VoIP Providers.
- The ports listed in this article are the default ports for 3CX Phone System. Before proceeding, confirm the SIP and RTP ports from 3CX Management Console Settings Network Ports tab, and the 3CX Tunnel port from 3CX Management Console Settings Network 3CX Tunnel tab.
- Once you have configured your router using the procedure in this article, you should confirm that the settings have been correctly applied using the 3CX Firewall Checker.
Configure the Firewall to Allow VoIP Traffic from the Internet
- Using your browser, browse to the IP address of the Zyxel P-662H-D1 Router.
- Log in using the administrator password.
- From the menu on the left, change to Security Firewall.
- If Active Firewall is not enabled, and you do not intend to enable the firewall, you can proceed to the next section (Configure NAT).
- If the Default Action for ‘WAN to LAN’ is set to ‘Permit’, and you do not intend to change this, you can proceed to the next section (Configure NAT).
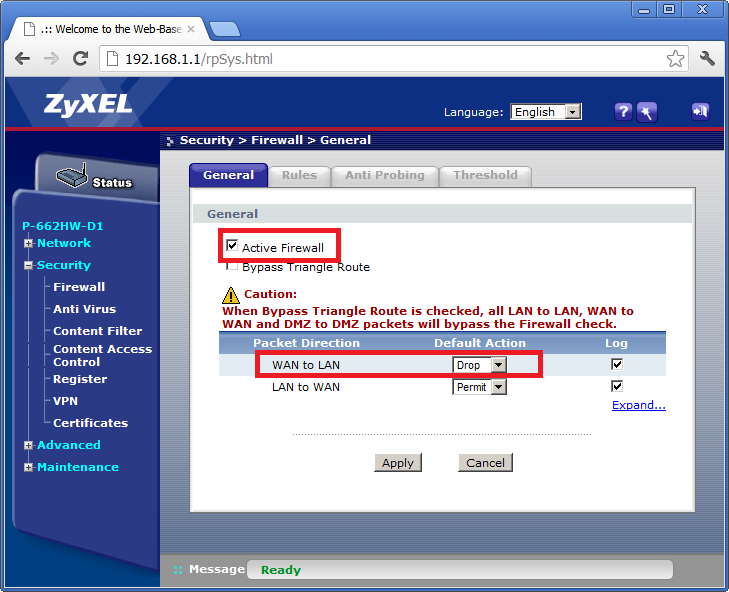
- Click on the Rules tab.
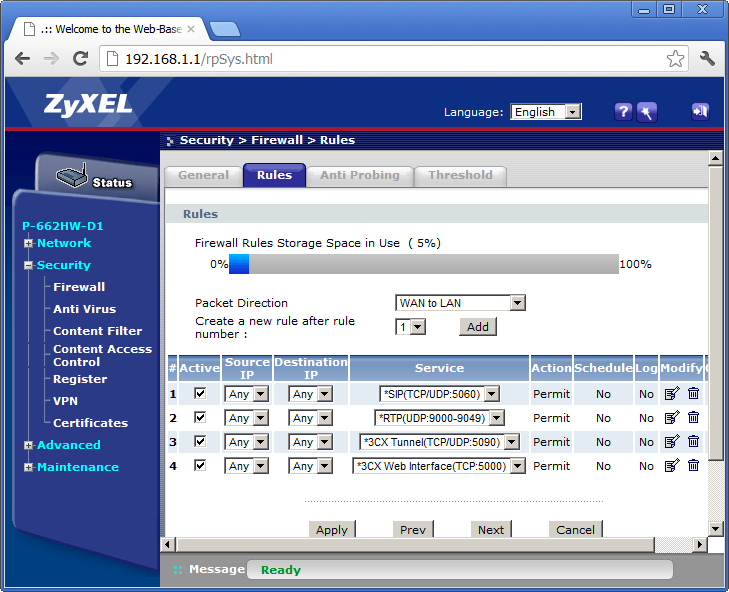
- From the Packet Direction drop down list, select ‘WAN to LAN’, and click the Add button.
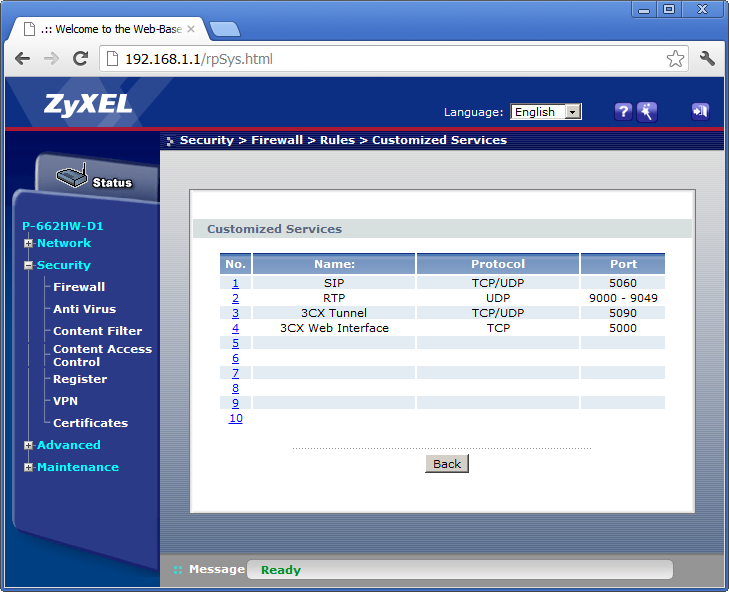
- Scroll to the ‘Services’ section, and click on the ‘Edit Customised Services’ link.
- Add the following services in the table (click on the number to add an entry). Click Back when done:
- SIP – TCP / UDP – 5060.
- RTP – UDP – 9000 – 9049.
- 3CX Tunnel – TCP / UDP – 5090 (not required for VoIP Providers).
- 3CX Web interface – TCP – 5000 (not required for VoIP Providers).
- Scroll back to the top and configure the following settings:
- Active: Enabled.
- Action for Matched Packets: Permit.
- Source – Address Type: Add IP address if known or leave default ‘Any Address’.
- Destination – Address Type: Add IP address if known or leave default ‘Any Address’.
- Service – Available Services: Add ‘*SIP (TCP/UDP:5060)’, and remove ‘Any (UDP)’ and ‘Any (TCP)’ from the list..
- Day to Apply: ‘Everyday’ (or as needed).
- Time of Day to Apply: ‘All day’ (or as needed).
- Click Apply when done.
- Repeat step 10 for each service configured in step 9. The rules should be similar to what is shown in this screenshot:
Configure NAT so that VoIP Traffic from the Internet is Forwarded to the PBX
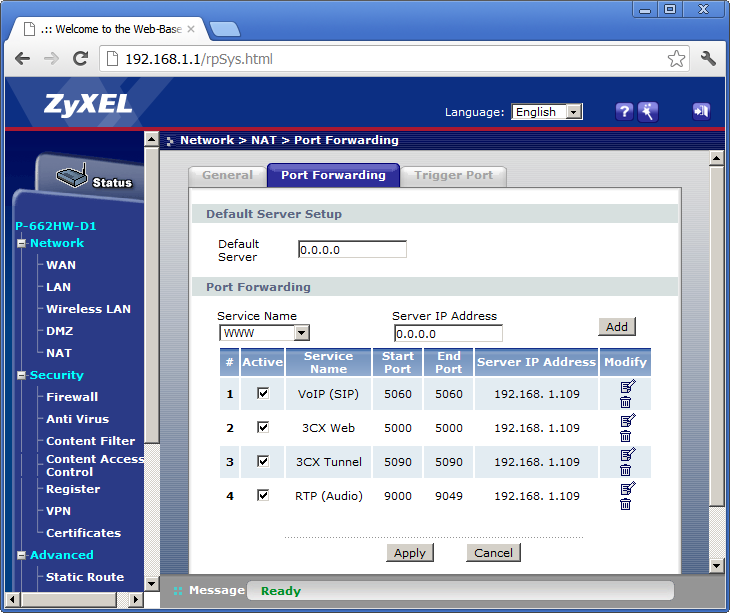
- From the menu on the left, change to Network – NAT.
- Click on Port Forwarding.
- In the Service Name, select ‘User define’.
- Configure the Rule as follows:
- Active: Enabled.
- Service Name: SIP.
- Start Port: 5060.
- End Port: 5060.
- Server IP Address: Internal IP of PBX (e.g. 192.168.1.109).
- Click Apply when done.
- Repeat steps 3 to 5 for the following ports:
- 3CX Web: 5000 (not required for VoIP Providers)/
- 3CX Tunnel: 5090 (not required for VoIP Providers)/
- RTP: 9000 – 9049/
Click Apply to save the configuration.