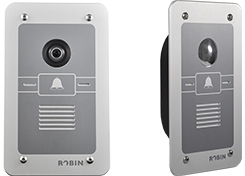
 If you need a simple SIP-based video door phone, the Robin Smartview should provide a simple solution. This document will explain the steps necessary to set up, configure, and test one of these devices for use with 3CX Phone System.
In this example, we will assume that the IP Address of the Robin is 10.0.0.42, and that the IP Address of the 3CX Phone System machine is 10.0.0.11.
Connecting the Robin Smartview to 3CX Phone System
- Plug the Robin Smartview into the network. If you use a PoE switch, it should power up automatically. If you use a non-PoE switch, however, you will also need to connect the device via a POR connector (supplied with the Robin device).
- Identify the IP Address for the door phone. To do this you can use one of the following techniques:
- Check your DHCP Server’s Management Console and identify the IP Address which has been leased to the device.
- Use Wireshark running on any PC in the same LAN as the Robin Smartview device, identify the DHCP requests and responses sent from and to the Robin Smartview device (you can filter for “bootp”), and within the DHCP ACK packet you will find the IP Address assigned to the device.
- Use the Discovery Tool supplied by Robin as described in the Robin Manual.
- Use the 3CX Management Console, to create a new extension for the Robin device. Details about how to configure an extension in 3CX Phone System can be found in the 3CX Phone System manual.
- Using a browser, navigate to the web interface of the Robin device (for example http://10.0.0.42). The default user name is ‘admin’ and the default password is ’123qwe’.
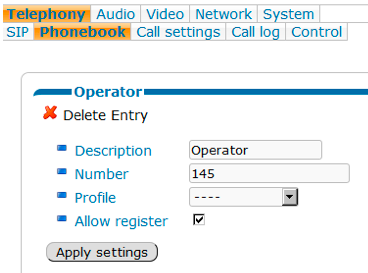
- Go to the “Telephony” tab and click on “Phonebook”:
- Go to the phonebook section and click on “Add Entry”.
- Enter the extension number you want to ring when the door bell button is pressed. This may be the number for an extension, or a ring group, or any other internal destination configured inside 3CX Phone System. However, should you want to see what the video camera is transmitting, the answering phone must be a video phone.
- Enter a description, enable the “Allow Register” option, then click on “Apply Setting”. If you want to add more extensions/groups for the device to call, you may add them in this Phonebook section.
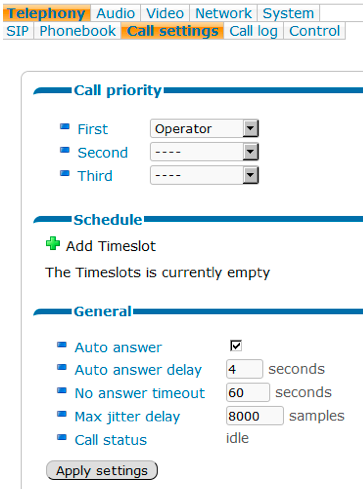
- Go to “Telephony – Call settings”, and under “Call Priority” select from the “First” menu the number/group you want to be called when the door bell rings. You can add a second and third number so that if the first does not answer, the call will go to the next (no answer timeout). When done, click on “Apply settings”.
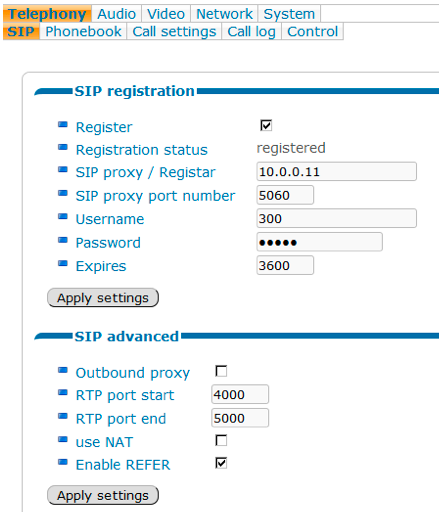
- Go to “Telephony – SIP” and configure the following:
- Enable the “Register” option.
- Set the “SIP proxy / Registrar” field to the IP address of the 3CX Phone System machine.
- Set the “Username” field to the extension number you configured earlier for this device.
- Set the “Password” field to the extension password you configured earlier for this device.
- Click on “Apply settings”.
At this stage the Robin Smartview Video Door Phone will register with 3CX Phone System.
A person at the door can press the button on the door phone and it will dial the destination you configured above. After answering the call, both people can talk to each other and, if a video phone is used, the person at the door can be seen on the video phone screen.
You can also call the person at the door phone by dialing the door phone’s extension number – the door phone will automatically answer the call, and both people can talk to each other. At any time during such a call, the internal extension can dial the trigger sequence “##” to activate the Electric Door Opener. More details now to setup and configure the door opener can be found in the Robin Video Doorphone manual.
IMPORTANT NOTE: If either of the extensions used (for the video phone or the Robin Smartview device) have the options “PBX delivers audio” enabled, or they have the option to “Record all calls” enabled, the call will not have any video. These options must be disabled for both extensions if you want video to be present on the call.
The device can also be configured with other options such as event triggering and motion detection. Details on how to enable these can also be found within the Robin Video Doorphone manual.